Hello! Valentine’s Day is just around the corner, so there’s an abundance of all things heart shaped in the shops just now. If you know me at all by now, you’ll know that I love chocolate. So, I just had to buy lots of foil covered chocolate hearts to craft with. Here’s my Pop Up Valentine’s treat holder…
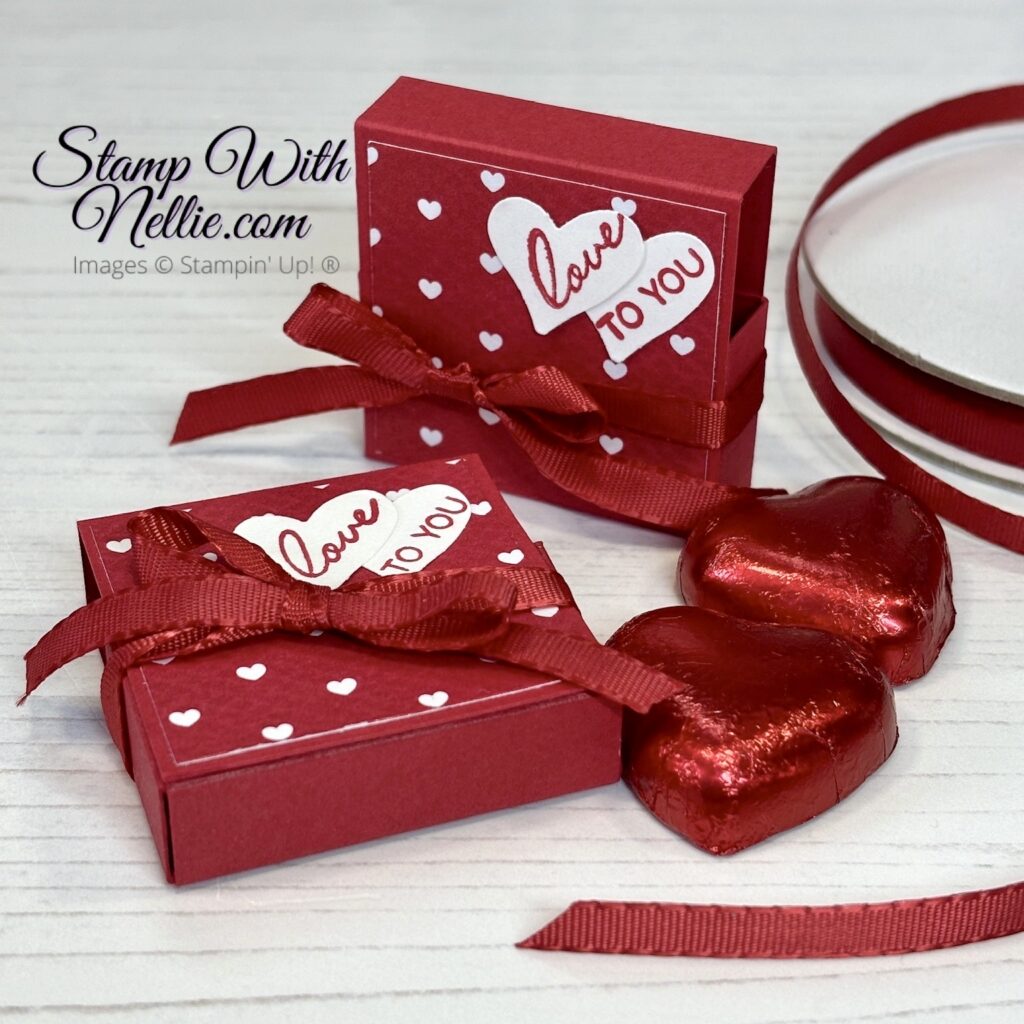
These tiny treat boxes hold just one chocolate heart. When you open the box it slides out…

And then pops up…

I recorded a video of me making one of these Pop Up Valentine’s treat and I’d love you to check it out…
youtube tutorial
I’d love you to click on the image above or if you prefer you can click here to pop over to YouTube and watch how I made my Pop Up Valentine’s treat holder. If you enjoy watching my video, I’d love you to give it a thumbs up and leave me a comment too. If you haven’t already subscribed to my channel, make sure you do so when you’re there; so you don’t miss out on future videos.
The finished treat holder measures just 1-3/4″ x 1-3/4″ x 1/2″
SUPPLIES
To make this Pop Up Valentine’s treat holder you’ll need the following supplies:
- Real Red card measuring 1-3/4″ x 5-1/2″ for the base
- score on the long side at 1-3/4″ x 2-1/4″, 4″ and 4-1/2″
- 2 pieces of Real Red card for the sides measuring 1″ x 1″ each
- score one side at 1/4” and 3/4″
- Real Red card measuring 1-1/2″ x 2″ for the pop up mechanism
- score on the long side at 1/4” and 3/4″
- Most Adored designer series paper measuring 1-5/8″ x 1-5/8″
- Scraps of white card to stamp and punch for decoration
- Ribbon
SHOP THE PRODUCTS
I’ve listed the products I used for today’s project below. You can click on any of the links in the Product List to visit that item in my online Stampin’ Up! store.
CUSTOMER APPRECIATION
When you shop with me you’ll receive a handmade card, like these ones and gift as a token of my appreciation. If your order is under £150 please use the current Host Code. This means that I can add in a free product to your customer thank you pack for the month. Find out more on the Host Code page in the main menu.
And don’t forget about the freebies you can earn with Sale-A-Bration until 29 February 2024…
Happy crafting,
Heather x
Product List")

 Specialty Designer Series Paper")


another clever gift box design!
Thank you so much Deborah ❤️
What a lovely litte treat box for Valentine.
I just watched your video and made a ‘dummy’ while watching you make it.
But you say that you scored the part for the sides at 1/4″ and above in the desctipton you write 1/2″ and 3/4″.
Thank you so much Carla. It should definitely be 1/4”. I will correct my typo as soon as possible. Thanks so much for letting me know about it ❤️