Hello, I hope you are well.
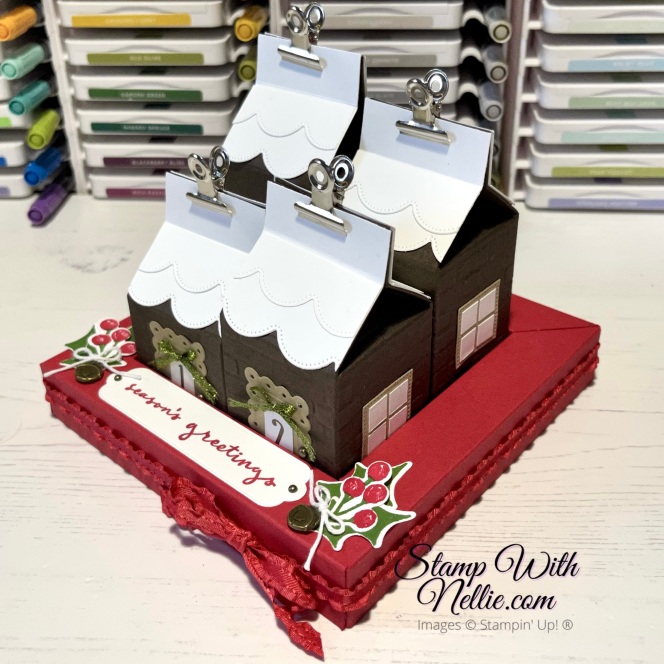
Yesterday I took part in the InspireInk Blog Hop for November 2022, that had the theme of Advent, with this project…
If you missed the blog hop then you can CLICK HERE to get the list of blogs to visit.
I promised a video tutorial in yesterday’s blog but actually I have 2 for you. The first part is making the gingerbread house style boxes and I’d love you to click on the image below to take a look at it…
Or you can CLICK HERE to watch it over on YouTube
The second (shorter) part is making the box tray to hold the 4 advent boxes and you can watch it by clicking on the following image…
Or CLICK HERE to watch this second video over on YouTube
I also promised that I’d give you the dimensions for each so here goes….

To make the 4 milk carton boxes you’ll need these supplies:
- Early Espresso card measuring
- Box 1 – 8-1/4″ x 6″
- Box 2 – 8-1/4″ x 6-1/2″
- Box 3 – 8-1/4″ x 7″
- Box 4 – 8-1/4″ x 7-1/2″
- Basic White card two 2″ x 8-1/4″ strips to die cut the ‘snow’ for the roofs
- score on the short side at 3/4″ as described in the first video
- cut into sections just over 2″ wide
- Basic White card in 3/4″ strips to die cut the second layer of ‘snow’ – again cut into sections just over 2″ wide once die cut
- Crumb Cake card to die cut the ‘doors’ (Scalloped Contours dies) and window frames (Stylish Shapes square die)
- Basic White scraps for the door numbers
- Basic White for the window panes measuring 3/8″ x 3/8″ – you need 4 per window x 3 windows per box x 4 boxes (48 in total)
- Rustic Metallic dots for the door handles
- Parakeet Party metallic woven ribbon for the bows on each door
- library clips (not sold by Stampin’ Up!)
Score lines for Box 1
- score the Early Espresso card on the long side at 2″, 4″, 6″ and 8″
- score on the short side at 2″, 4″, 5-1/4″
- score on the long side at 3″ and 7″ but only from the top to the first horizontal score line
Score lines for Box 2
- score the Early Espresso card on the long side at 2″, 4″, 6″ and 8″
- score on the short side at 2″, 4-1/2″, 5-3/4″
- score on the long side at 3″ and 7″ but only from the top to the first horizontal score line
Score lines for Box 3
- score the Early Espresso card on the long side at 2″, 4″, 6″ and 8″
- score on the short side at 2″, 5″, 6-1/4″
- score on the long side at 3″ and 7″ but only from the top to the first horizontal score line
Score lines for Box 4
- score the Early Espresso card on the long side at 2″, 4″, 6″ and 8″
- score on the short side at 2″, 5-1/2″, 6-3/4″
- score on the long side at 3″ and 7″ but only from the top to the first horizontal score line
Each box needs to be scored and then embossed with the Brick & Mortar 3D embossing folder. You then need to score the lines again to make it easier to cut and fold as shown in the first video along with the diagonal score lines on the side panels.

To make the box frame you’ll need the following supplies:
- Four pieces of Real Red card that each measure 6-5/8″ x 4-1/2″
- score each of them on the short side at 1/2″, 1-/2″, 2-1/2″ and 3-1/2″
- score on the long side at 1/2″ for the full length
- score on the long side at 1-1/2″ but only on the 3rd horizontal section (with the 1/2″ wide section at the top)
- cut and glue as shown in the second video.
- Basic White card to stamp and die cut the holly, berries and sentiment to decorate the frame
- Real Red mini ruffled ribbon
- Flat Jingle Bell trinkets
I hope you’ve enjoyed this project and will give it a try too.
Shop the products
I’ve listed the products I used for today’s project below. You can click on any of the links to see that product in my online shop.
When you shop with me you’ll receive a handmade card and gift as a token of my appreciation. If your order is under £150 please use the current Host Code so that I can add in a free product to your customer thank you pack for the month. Find out more on the Host Code page in the main menu.
Happy crafting,
Heather x
Product List  | ||
 |  |  |
 | ||
 | ||
 |  |  |
 |  | |
 |  |  |
")


 Mini Ruffled Ribbon")
 Metallic Woven Ribbon")


Leave a Reply