Hello. I hope you are well.
In yesterday’s blog post I shared a card using the Sun Prints suite featuring a Granite Gray design from the paper pack. I loved the end result but I must admit that the blue coloured designs are still my favourite!
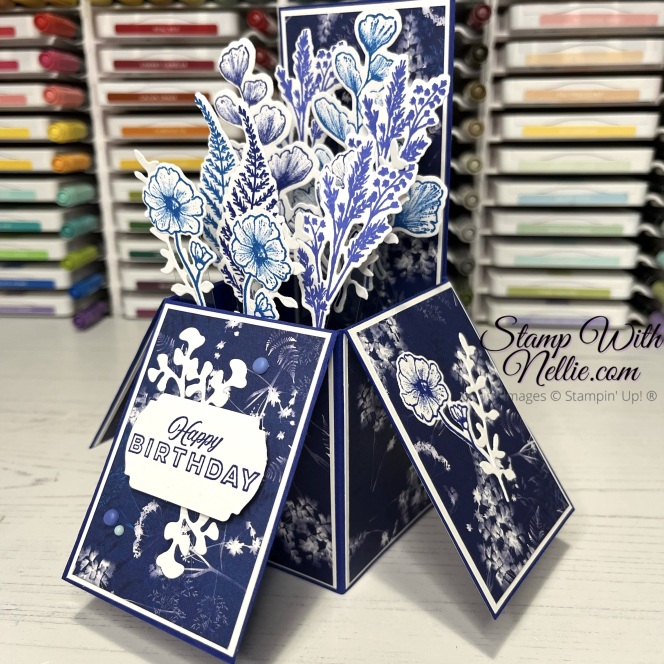
So I used those recently for a card for one of my favourite people in my life, who also love blues! And here it is…

My card base is the new In Color Starry Sky. Isn’t it gorgeous?

The Sun Prints designer series paper also features Pacific Point so I used that when creating the flowers and leaves for this fun pop up card. I added in Orchid Oasis too as it’s just so pretty that I couldn’t resist.

All of the foliage was created by using the Nature’s Prints stamp set and the coordinating Natural Prints dies. I glued each piece to a strip of Window Sheet so that they appear to move in mid air – until you look closely! Lol.
My sentiment is from the Celebrating You stamp set and I used the Label Me Fancy punch.
I love this type of card but they are a labour of love to put together. It still amazes me that they fold flat to fit into a 5″ x 7″ envelope!

To create this I used the following:
- A4 sheet of Starry Sky card
- scored on the long side at 2-1/2″, 5″, 7-1/2″ & 10″
- scored on the short side at 3-1/2″
- trim the A4 sheet down to 7″ x 10-1/2″
- use the long leftover piece to make the internal supports as shown in the video below
- Basic White card
- 9 pieces that measure 2-3/8″ x 3-3/8″
- 2 pieces that measure 2-3/8″ x 6-7/8″
- lots of scraps for stamping and die cutting the foliage
- a scrap to stamp and punch the sentiment
- Sun Prints designer series paper
- 9 pieces that measure 2-1/4″ x 3-1/4″
- 1 piece that measures 2-1/4″ x 6-3/4″
To see how to create this card please do what I did the first time I made one, and watch this fabulous tutorial from my lovely friend Gez of Nigezza Creates…
I still watch this video when I need a refresher on how to make these cards.
Gez’s version is different in that the height is split at 4″ whilst mine is at 3-1/2″ but the method is just the same. If you’d like the measurements for Gez’s version then please CLICK HERE to see her blog post.
These cards are not overly difficult to make but the more elements you add into the centre the longer it will take you. Some people really are worth the effort though!
I do hope you like my card. I know for sure that my best friend did.
Shop the products
I’ve listed all of the products I used for today’s project below. You can click on any of the links to see that product in my online shop. The stamp set and the dies I used can be purchased separately but if you buy them as a bundle you’ll save 10% so I’ve shown both options in my product list.
When you shop with me you’ll receive a handmade card and gift as a token of my appreciation. If your order is under £150 please use the current Host Code so that I can add in a free product to your customer thank you pack for the month. Find out more on the Host Code page in the main menu.
Happy crafting,
Heather x
Product List


[…] Visit Heather’s blog HERE […]