Hello.
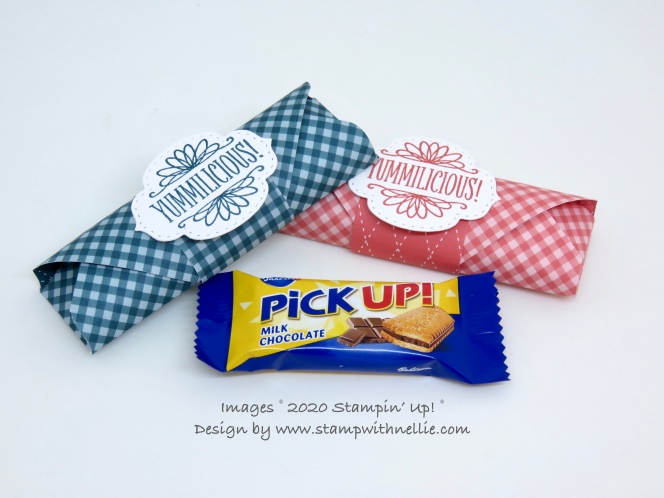
I used to use my envelope punch board lots and one of my favourite things was to make wrappers for Kit Kats and hand them to people that needed to ‘take a break’. Stampin’ Up! no longer sell an envelope punch board but I’ve kept mine and still make my own envelopes every once in a while.
I spotted a bag of mini Pick Up! biscuit bars recently and it inspired me to recreate my Kit Kat wrappers for these biscuits with and without using an envelope punch board. Can you tell the difference?
The Pretty Peacock one was made with the envelope punch board. I trimmed some 2019-2021 In Color 6″ x 6″ designer series paper down to 4-5/8″ x 4-5/8″ and did my first punch and score at 1-1/2″. If you’re familiar with the punch board, you’ll know the rest.
The Terracotta Tile one was made with a ruler and pencil instead of the envelope punch board. You still need to start with the same size of paper.
Make pencil marks on the inside of your paper at 1″ and 1-3/4″ at the top left corner, on both sides. Do the same on the bottom right corner. Draw a line to connect the marks at 1-3/” at the top and then the ones at the bottom. Draw a line to connect the 1″ marks at the top to the ones at the bottom as shown below…
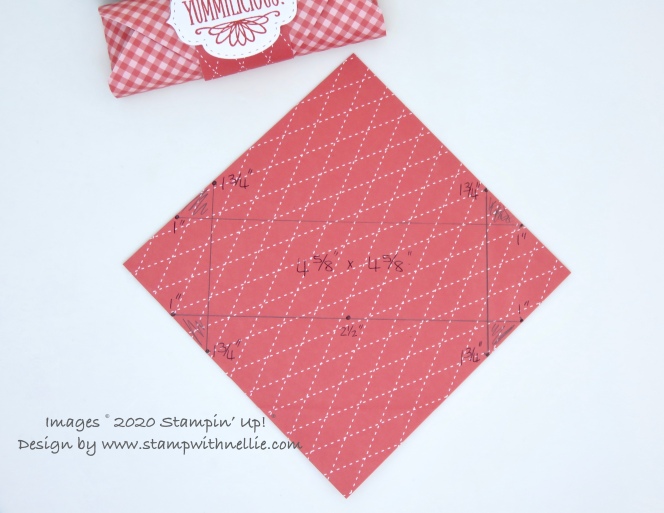
You now need to score along these lines. If you don’t have a scoring tool you can improvise with folding the paper over your ruler instead.
You need to cut out the shaded triangles. You’ll notice that I’ve also added a mark at 2-1/2″ on the bottom, you need to fold up the point of your square to meet this mark to make the wrapper easier to close…
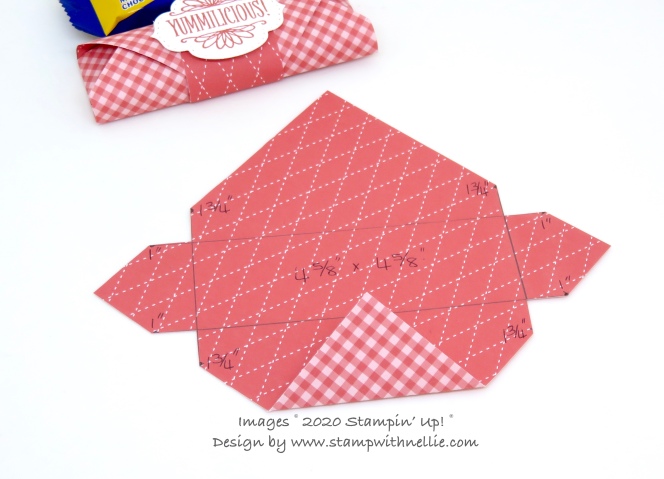
Place your biscuit in the rectangle and fold up the 2 small side tabs. The fold up the bottom (part folded) part and finally wrap over the top section, the tip of this will end up on the base.
When you trimmed your 6″ x 6″ paper you will have 2 pieces left over. You can use the shorter one for your belly band, either showing the same or opposite side. Glue the ends together on the base.
I stamped the “Yummilicous” stamp from So Sentimental with coordinating ink onto Whisper White card and cut it with a Stitched So Sweetly die. I simply glued the middle part of this to the top of the belly band. Easy!
These will be cute to hand out to people that need a little Pick Up! A little treat can do wonders, can’t it?
I hope you like this project and will give it a try. I’ve listed the products I used below. You can click on any of the links to visit my online Stampin’ Up! shop at any time.
The So Sentimental stamp set and the Stitched So Sweetly dies are available as a bundle, which gives you a saving of 10% on the cost of buying them separately, so I’ve shown both options in my Product List.
Happy crafting,
Heather x
Product List ") |  | |
 | ||
")
 Designer Series Paper")


Leave a Reply