
Hello! Today I’m taking part in the InspireInk blog hop and this month our theme is Easter. This was a bit of a struggle for me as I don’t actually have any Easter themed stamps or dies. The first thing that springs to mind for me when anyone mentions Easter is of course chocolate eggs. So I decided to make a box for a small chocolate egg.
I’ve made what seems to be called an ‘Impossible Box’ which makes them sound tricky but they’re not, thank goodness! There are lots of examples of this style of box on Pinterest and plenty of tutorials on YouTube so it’s hard to credit the original designer. I watched a tutorial from The Paper Pixie and she gives credit to the lovely Angelina Clark of Intatwyne Designs so I’ll go with that. The box from the tutorial was for was far too big for my plans so I had to resize it.
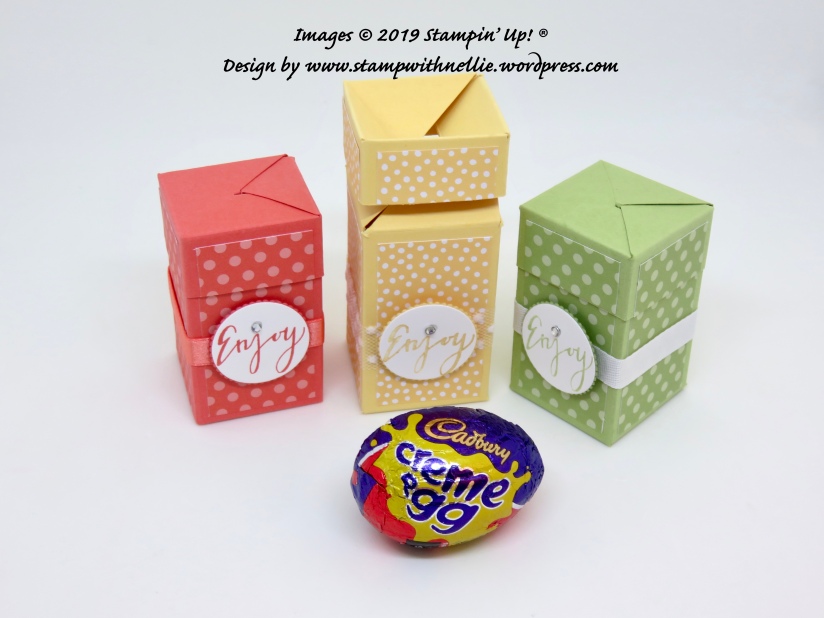
My card size is 6 & 1/2 inches by 6 & 1/4 inches and the end result is a box that measures 1 & 1/2 inches, by 1 & 1/2 inches by 2 & 1/2 inches and is a really nice fit for a Cadbury Creme Egg (or any similar sized egg) and because I couldn’t decide on a colour scheme I made 3 of them…

My colours are Calypso Coral, So Saffron and Pear Pizzaz. These are all part of the Subtles colour family so I used some of the 6 x 6 inch Subtles Designer Series Paper for my decoration. The stamp I used is from the Climbing Orchid stamp set and says Enjoy today but I just masked off the ‘today’. I added ribbon around the middle of each box and cut my sentiments and backing circles with the Layering Circle framelit dies before adding them to the front of the box with dimensionals. As always, I added a rhinestone for that little bit of bling!
The top of the box slides up so that you can drop your chocolate egg inside…
If you’d like to see how this box is made you can keep on reading, but if you’d rather hop along to the next blog then please click on the blue button in the box below to see all of the projects. You can then click on each image to visit these fabulous blogs and view their Easter creations in more detail…
In case you’re still with me, here’s the scoring template for the box…
- Score on the long side at 1 & 1/2 inches, 3 inches, 4 & 1/2 inches and 6 inches
- Score on the short side at 1 & 1/2 inches, 4 inches, 4 & 3/4 inches and 5 & 1/2 inches

Fold along the 2nd score line from the top (marked in pencil in above photo) and then make a mark at 3/4 inch, 2 & 1/4 inches, 3 & 3/4 inches and 5 & 1/4 inches. You can then use these marks to create diagonal cutting lines as shown in the photo below

Keep the top section folded back and then cut along these dotted lines and you will have a template that looks like this

The top 3/4 inch panel is turned over the front on the card before you assemble the box and this forms part of the lid. You want to add glue to the tab A and then fold up your box as normal…

You may want to add your DSP before you do this and the measurements for the 4 main panels of the box are 1 & 1/4 inch by 2 & 1/4 inches. I would recommend adding the DSP on the lid part after it’s been glued. The DSP for the lid measures 1 & 1/4 inch by 5/8ths and again you’ll need 4 of them.
When the top is folded down add glue to tab B and stick it to the next section, I hope this makes sense when you do it but let me know if it doesn’t and I’ll try harder, lol.
I’ve described the rest of my decoration above and you’ll see that I used a different ribbon for each of my boxes. I’ve listed all of the products used in my project below and you can click on any of the links to visit my online Stampin’ Up! shop.
Now, scroll back up and hop along to the next blog to read all about the next fabulous Easter themed project from my talented friends.
Happy hopping,
Heather x
Product List  |  | |
 So Saffron Classic Stampin’ Pad [126957] £6.00 | ||
 | ||
 Designer Series Paper")


 Polka Dot Tulle Ribbon")
 Satin Ribbon")

Heather these are brilliant treat boxes love them x
Thanks Karen x
Very nicely made Heather x
Thanks Verity xx
Mmmm, Yummy eggs and a beautiful box to hold them, Christine xx
Thanks Christine xx
These are so cute and your instructions are so easy to follow – i am gooing to have a go very soon x
Thanks Janice, have fun with them 😊 xx