Hello and thanks for visiting.
Today’s project is one that I’ve been meaning to try for months! I’ve made so called “Impossible Boxes” before but they’ve always been square and I hadn’t even considered a rectangular one until my lovely crafty friend Anne-Marie made some last summer. You can see Anne-Marie’s tutorial over on her blog by CLICKING HERE, this also has a link to the Paper Pixie’s YouTube tutorial for the square version.
While you’re at it, why not check out more of Anne-Marie’s ideas on www.traighpapercrafting.wordpress.com.
So here’s my version…


This was specifically made to fit a little manicure set…


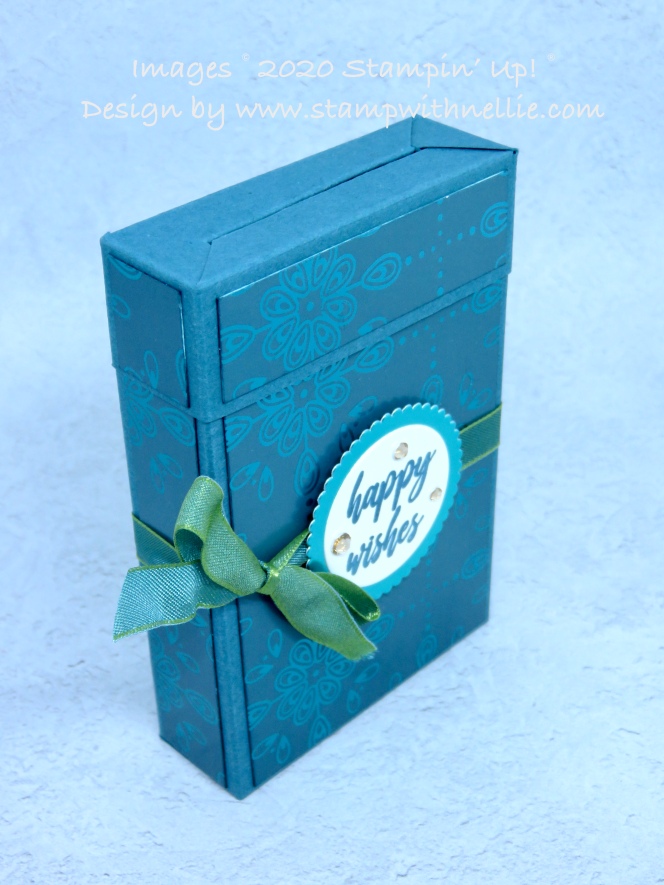
The dimensions of my Impossible Box end up as 3″ wide, 4-1/2″ tall and 1″ deep. To create this I used Pretty Peacock card that measures 7-1/2″ x 8-1/2″
On the long side I scored at 3″, 4″, 7″ and 8″. Turn anti-clockwise so the 1/2″ strip is at the top and then score the short side at 1″, 1-1/2″, 2″ and 6-1/2″. Turn your back to how you started and make marks on the 2nd horizontal score line at 1/2″, 3-1/2″,4-1/2″ and 7-1/2″.
I recommend that you check out Anne-Marie’s and the Paper Pixie’s instructions but here’s my cutting guide. I folded the card along the 2nd horizontal score line and used the marks to cut out triangles down to the 3rd horizontal score line.

I then added my panels of Noble Peacock Speciality Designer Series Paper to the main body of the box. You need 2 that measure 2-3/4″ x 4-1/4″ for the front and back plus 2 that measure 3/4″ x 4-1/4″ for the sides.
TOP TIPS:
- Use a sponge dauber to add Pretty Peacock ink to the sides of your Noble Peacock Speciality Designer Series Paper so you don’t have white edges showing
- Remember to fold your top section down before you glue the box together! (Yes, I forgot the first time!!)
Once assembled I added more Noble Peacock paper to the lid. You need 2 that measure 3/4″ x 2-3/4″ and 2 that measure 3/4″ x 3/4″
To decorate I added some Old Olive/Pretty Peacock reversible ribbon tied in a bow. I stamped the sentiment from the A Wish For Everything set in Pretty Peacock ink onto Whisper White card and cut it with a Layering Circles die. I used a larger die from the set to cut the scalloped circle from Noble Peacock Foil sheet. I added this over the ribbon with Stampin’ Dimensionals.
As a final touch I added 3 Champagne Rhinestones to coordinate with the colour of the manicure set.
I hope you’ve enjoyed today’s project and will be inspired to try it out. I’ve listed the Stampin’ Up! products I’ve used below and you can click on the links to start shopping. Remember to use this month’s Host Code if your order is under £150.
Happy crafting,
Heather x
Product List  | ||
 |  | |
 | ||
 |

 Reversible Ribbon")


this is lovely – thank you for sharing with us
Thank you so much