Hello and thanks for joining me.
Inspiration for today’s project came from the lovely Amanda Charlesworth who is also known in the Stampin’ Up! world as Scrimping Mommy. If you’ve ever watched Amanda’s YouTube videos you’ll know that she’s a right Yorkshire lass with the most amazing giggle.
When I recreated her Mini Album last week (click here if you missed it) I spotted another video for a stationery holder. I’m sure we’ve all got at least one friend that seems to have an obsession with stationery, or maybe it’s you in your circle of friends.
Although I liked Amanda’s version she used 12 x 12 inch card and I mainly have A4 card as it’s easier to store. I also wanted to make a different version that also has a pen holder and would hold a larger sticky note pad. If you’re interested in Amanda’s video here’s the link – click here. Be warned though, once you start watching her videos you might be there a while, she’s addictive, lol.
Here’s my version using the Follow Your Art suite as I thought all those pens and pencils on the paper were ideal…

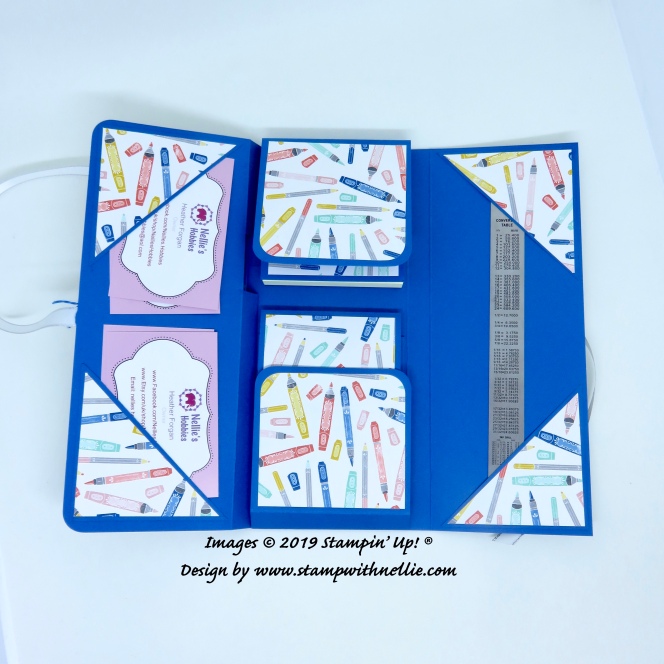
And here are the inside shots…


The top part is a covered sticky note pad and the bottom is a covered note pad. Both can be removed and replaced once they’ve been used up as they slide under strips to hold them in place and the flaps stop them falling out when the holder is closed up (those were part of Amanda’s design).
If you want to make my version you’ll need:
- For the base, one full sheet of A4 card (8 & 1/4 inches by 11& 5/8 inches). Score on the long side at 3 & 1/4 inches, 3 & 3/4 inches, 4 & 1/4 inches, 8 inches and 8 &1/2 inches)
- For the flaps, 2 pieces of card measuring 4 by 3 &1/4 inches. Score on the long side at 1/2 an inch and 1 inch.
- For the corner pockets, 2 pieces of card measuring 3 x 3 inches, cut in half diagonally.
- To hold the note pad and sticky notes in place, 2 pieces of card measuring 4 & 1/4 inches by 3/4 of an inch. Score at 1/2 an inch and 3 & 3/4 inches.
- Designer series paper for the front and inside the cover measuring 3 by 8 inches.
- Designer series paper for the back measuring 3 & 1/2 by 8 inches.
- Designer series paper for each flap measuring 2 & 3/4 by 3 inches
- Designer series paper for the corner pockets – 2 pieces measuring 2 & 3/4 by 2 & 3/4 inches, cut in half diagonally.
- A sticky note pad measuring 3 x 3 inches. Card to cover this measuring 3 by 6 & 3/8 inches; score at 3 & 1/16 and then wrap around the top and toward the back to get a close fit. Designer series paper to decorate measuring 2 & 3/4 x 2 & 3/4 inches.
- An A7 note pad. Card to cover this measuring at least 7 & 1/2 inches (I used 8 & 1/4 inches) by 3 inches; score at 4 & 1/4 and then wrap around the top and toward the back to get a close fit. Designer series paper to decorate measuring 2 & 3/4 inches by 4 inches.
I used Pacific Point for my card choice.
To create the pen holder on the side I cut 2 lines across the first to third score lines and added glue to parts shown in the photo below…

To add the flaps I cut little wedges off the corners to the first score line and then glued that section to the base, lining the edge up to the base card as shown below…

Before adding the designer series paper I glued some Silver Metallic Edge ribbon to the front and back, leaving plenty excess to be able to tie in a bow to keep the holder closed.
I added my designer series paper to the corner pockets and then glued the 2 outside edges only to the base.
When you add your strips that will hold the note pads in place make sure you leave enough room for the sticky note pad so that it doesn’t stick out of the top – it won’t slide all the way down because of the sticky section. Mine was a snug fit as I forgot to measure how long the sticky bit is. That was a near miss!
I think the addition of the pen holder and the corner pockets will make this much more usable…

To decorate the front I used the sentiment from It Starts With Art with Pacific Point ink on Whisper White card. I cut it with my Classic Label punch and cut 2 more from Pacific Point card to add to the back. The felt embellishments come from the Follow Your Art embellishment kit.
I added the little metal heart charm with some of the twine from the kit. It looks like this is simply tied around the ribbon but I stuck it on with a glue dot so that it won’t fall off. I also glued the bow so it won’t untie itself.
I hope you’ve enjoyed this project. I certainly enjoyed making it and I hope someone will enjoy using it.
I’ve listed all of the products used below, with links to my friend Valerie’s online Stampin’ Up! store.
Happy crafting,
Heather x
Product List


[…] Visit Heather’s blog here […]