Hello and thanks for visiting.
Yesterday I took part in the InspireInk Blog Hop with the theme of Birthdays and shared this card…

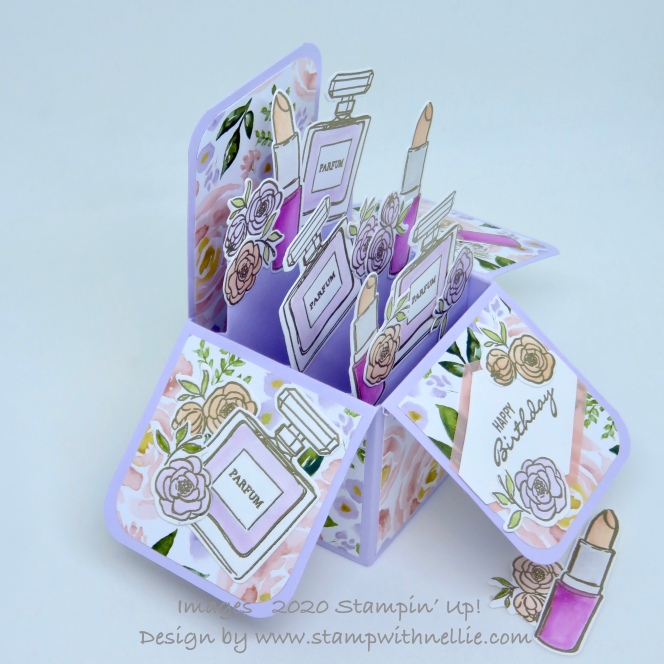
As promised, this post gives you the information you need to create your own version of this card.
To make the box card base I used Purple Posy card cut to measure 10-1/2″ x 5″ scored on the long side at 2-1/2″, 5″, 7-12″ and 10″. Also scored on the short side at 5″
Here’s your cutting guide. Cut off the top section of the skinny panel and cut down the next 3 score lines but not the last one, so that the back of the card is full length.

I used my Delicate Trio punch to round the corners of the top sections.
I added Best Dressed designer series paper (DSP) to the 3 bottom sections that each measure 2-1/4″ x 2-1/4″ and a piece of Petal Pink card measuring 4-3/4″ x 2-1/4″ (with the top 2 corners rounded) onto the full length panel.
I then added glue to the skinny panel and adhered this to the inside of the full length panel to form the box.
I cut another 3 panels of DSP to measure 2-1/4″ x 2-1/4″ and rounded 2 corners of them. These were added to the inside of the top panels. I added a piece of DSP to the inside of the full length panel too, this measures 4-3/4″ x 2-1/4″ and again I rounded the top 2 corners.
I then made the 3 panels for the inside of the box to add my decorations to. Again I used Purple Posy card. I cut pieces as follows:
- 3-1/2″ x 3″
- 3-1/2″ x 3-1/2″
- 3-1/2″ x 4
On each piece, on the 3-1/2″ side, score at 1/2″ and 3″ then measure and add a pencil mark 2-1/2″ from the bottom of each piece. Cut from the top of the score lines down to your pencil marks (or a little bit further) and cut a diagonal line out to the edge as shown below.

I also cut a little wedge off the bottom sections too, but it might actually be easier to add these sections to your card if you leave the bottom edge straight.
I rounded the top 2 corners and ended up with 3 pieces like this…

I added the tallest piece into the inside of my box card first. I added glue to the 1/2″ tabs and butted them up to the back of the box section, making sure that the bottom edge also lines up with the bottom of the card. I added the 2nd tallest piece into the middle of my box and finally the smallest piece close to the front.
I then made my decorations to all to the tops of these sections.

I stamped the perfume bottles, lipsticks and flowers from the Dressed To Impress stamp set in Versamark ink onto scraps of Whisper White card. I added Gold Stampin’ Emboss Powder and heat set it before cutting each part out with the coordinating die from the All Dressed Up die set.
I think this set lends itself to watercoloring, especially when combined with the soft impressionist style floral patterns from the Best Dressed DSP.
I used Petal Pink, Smoky Slate and Rich Razzleberry to colour the lipsticks.
I used Purple Posy ink for the perfume bottles.
I used Petal Pink and Purple Posy inks for the flowers and Old Olive ink for the leaves. You can either use ink pads or Stampin’ Write Markers to add ink to a clear block and then use an Aquapainter to watercolour each piece. As I used card rather than Watercolor paper I didn’t add any water to the card, just to my clear block.
I added some extra pieces to the side flaps and the back of the card…

I also heat embossed the Happy Birthday sentiment, which comes from the Botanical Bliss stamp set, and cut it with my Tailored Tag punch. I cut an extra tag from the Petal Pink vellum from the Perennial Essence pack, cut it in half and added it to the stamped one. I added some more flowers to the tag too.
The card folds flat (well kind of!) so that it can go into an envelope. It measures 5″ x 5″ so I made my envelope from Petal Pink card measuring 8-1/8″ x 8-1/8″. Using my envelope punch board I punched and scored at 4-1/8″. As the card is a little bit bulky I added an extra score line on the flap so that it’s easier to close.

This was most definitely a labour of love and I hope you agree that the result is worth the time spent.
I hope you enjoyed my project and you also took the time to visit the other blogs in yesterday’s hop to get more birthday inspiration from my talented team mates. If not, please go back to yesterday’s post and follow the link, you won’t be disappointed!
I had so much fun with this card I’ve made a coordinating box for a little gift that I will share with you tomorrow, so please pop back.
I have listed the products used in today’s project. You can click on any of these links to visit my online Stampin’ Up! store. Remember to check out my Host Code page to make sure you get the best value for your money.
And don’t forget that with every spend of £45 between now and 31st March 2020 you can earn yourself a free Sale-A-Bration product…

Just get in touch if you have any questions.
Happy crafting,
Heather x
Product List


Love this!
Thank you xx
This handmade box will surely be a pretty surprise for someone`s birthday, it is not expensive, original and really beautiful.