Hello.
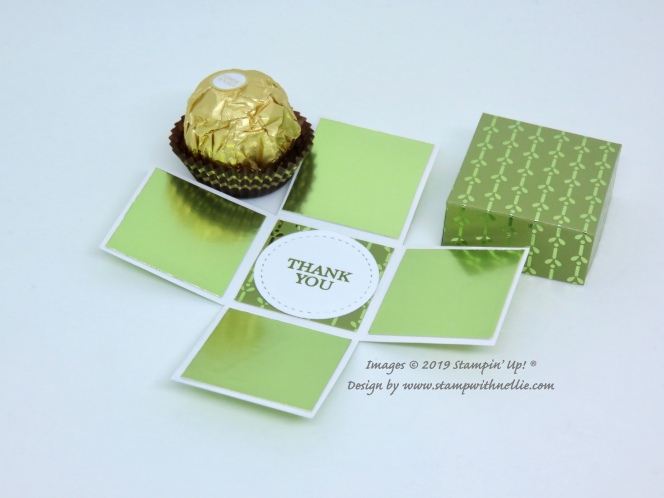
After showing you the ‘exploding’ card I made yesterday I thought I’d also make an ‘exploding’ box. I hadn’t made any little boxes for Fererro Rocher chocolates recently so I combined the 2 ideas…

I decided not to add any decoration to the lid but once you lift it off this is what is revealed…

And when you lift out the chocolate you see the message…
How sweet is that? If you pardon the pun!
These are really quick and easy to make. To make the base I used a piece of Noble Peacock Foil sheet measuring 4 & 1/2 inches by 4 & 1/2 inches and scored it on both sides at 1 & 1/2 inches and 3 inches. I cut away the 4 outside corners. I then trimmed the bits I cut out down to 1 & 3/8 inches by 1 & 3/8 inches, I glued these pieces to the inside flaps – waste not want not.
To make the lid I knew that this foil is pretty thick and I would be doubling it up on the base so I made my lid a bit bigger than I normally would. This makes it much easier to fit and the sides flop out a little to make sure the lid won’t fall off. I cut a piece of the Noble Peacock Speciality designer series paper to measure 4 & 5/8 inches by 4 & 5/8 inches. I scored this on each side at 3/4 of an inch and then cut up the score lines on the outside corners and wedged them to form the tabs to glue to the inside and form the box lid.
I added another piece of the Noble Peacock Speciality DSP to measure 1 & 3/8 inches by 1 & 3/8 inches and glued that to the middle square of the bottom of the box. I stamped the THANK YOU from the A Big Thank You stamp set in Old Olive ink onto Whisper White card and cut it with the smallest circle from the Stitched Shapes dies and glued this to the middle of the box bottom too.
Pop in your chocolate, fold up the sides and add the lid – easy peasy lemon squeezy, lol.
I hope you’ll give making these tiny treats a go. I’ve listed the products I’ve used below and you can click the links to purchase any of them.
Happy crafting,
Heather x
Product List  | ||
 |  |  |


[…] Visit Heather’s blog here […]